Saturday, November 17, 2012

DIY Wedding Crafts - Origami Flower Centerpieces

In addition to the origami flower bouquets, we made origami centerpieces!  (Inspired by etsy http://www.etsy.com/listing/80323307/paper-flower-centerpieces-origami ) Again, using regular printer paper in different colors, and Japaneses newspaper.  We made about 25 centerpieces.  Each centerpiece had about 17 flowers - each with 5 petals - needless to say . . . we did a lot of folding!  But, we saved a lot of money!

www.lwadamelon.blogspot.com

First, we purchased a bundle of small shipping boxes for cheap (at most, $1/box).  I wrapped/glued a thick brown ribbon around the middle of the box (cheap find from a local flea market).

www.lwadamelon.blogspot.com


Then, I bunched a bunch of old recycled papers (i.e. our old junk mail! $0!) into a ball.  I used many layers, so that it would fit tightly into the box.  To hide the outer layer, I wrapped old white tissue paper (leftover from gifts we received) around the ball and taped the bottom.  The ball was then stuffed into the box - with the top sticking out just a tad, in order to create a rounded dome, on top.

Next, I hot glued about 9 flowers in a circle, to the tissue paper - creating the bottom level.  About 6-7 flowers were in the next layer up.  Then I bunched up a small wad of tissue paper, glued it to the top of the dome, and added 1 flower in the middle (otherwise the top flower would look like it sunk in).  I used strips of paper to fill in the gaps between flowers (I glued the 2 ends of the paper to the tissue paper dome - so that they were a U-shape).

www.quinnphotography.net, www.lwadamelon.blogspot.com
 Photographed by Quinn Photography

The centerpieces were placed upon a rounded mirror surrounded by tea lights (provided by our venue).  Guests were able to take home the centerpieces.  We also have a few displayed in our home.

www.quinnphotography.net, www.lwadamelon.blogspot.com
 Photographed by Quinn Photography

www.quinnphotography.net, www.lwadamelon.blogspot.com
Photographed by Quinn Photography

Wednesday, November 14, 2012

DIY Wedding Crafts - Origami Flower Bouquets

Wanting to keep everything under budget, we decided to make all of the flowers for our wedding.  In addition, this was a great way to incorporate our Nikkei culture into the wedding - through origami.  An added bonus was that all of our flowers would last forever.  My bouquet is currently displayed in our family room!

I originally got inspiration from here http://www.capitolromance.com/2011/09/21/diy-how-to-origami-paper-flower-bouquet/  But, I wanted to change it a little, to match the colors or our wedding, and to create a little more space between flowers.  2 sizes of origami flowers were used for the bouquets.  We used regular printer paper (in different colors), free Japanese papers (from my old job, or from the local Japanese grocery store), and leftover Washi paper (from making our wedding invitations).

Each flower had a toothpick hot glued in the bottom/center.  This helped keep the flowers together.  And, this was how I stuck the flowers into a styrofoam ball (I snapped the toothpicks in half, so they would not be as long.  Also, I added hot glue to the hole I poked the toothpick in, in order to help keep the flowers in).  A larger styrofoam ball was used for the bride's bouquet. To fill in little gaps between flowers, I glued both ends of a strip of paper to a toothpick, and stuck it in the styrofoam.
 
For the handles, disposable wooden chopsticks were bunched together - then ribbon was wrapped around them.  This was also hot glued and poked into the styrofoam ball, in order to hold it together.  For the flowergirl's bouquet, I glued a ribbon holder on the top, instead of using wooden chopsticks.

Here are a few pictures:

This is the bride's bouquet.

www.quinnphotography.net, www.lwadamelon.blogspot.com
 Photographed by Quinn Photography


www.quinnphotography.net, www.lwadamelon.blogspot.com
Photographed by Quinn Photography


Here are a couple of the bridesmaids' bouquets (Sorry they are a little blurry - the camera focus was on the bridesmaids' faces).

www.quinnphotography.net, www.lwadamelon.blogspot.com
Photographed by Quinn Photography (but cropped by the bride)

www.quinnphotography.net, www.lwadamelon.blogspot.com
Photographed by Quinn Photography (but cropped by the bride)

Here are a couple pictures of the flowergirl's bouquet.

www.quinnphotography.net, www.lwadamelon.blogspot.com
 Photographed by Quinn Photography (but cropped by the bride)


www.quinnphotography.net, www.lwadamelon.blogspot.com
Photographed by Quinn Photography (but cropped by the bride)

www.lwadamelon.blogspot.com


Monday, November 5, 2012

DIY Wedding Crafts - Handbeaded Sash

. . . and so it begins! The DIY wedding craft blog posts! . . .


My husband, family, and I spent numerous hours with DIY projects for our wedding . . . so be prepared for quite a few posts!  hehe.

Let's see . . . to begin . . . one of the first things I had to buy was my wedding dress.  Being Nikkei, we wanted to find different ways in which to incorporate our cultures into our weddings.   So, one of the first things I purchased was a Japanese obi for my dress (My favorite website for purchasing vintage kimonos and obis!  http://www.ichiroya.com/index.php  - I spent hours and hours searching the web for authentic obis sold for decent prices).  I got this idea from a family friend.  The bridal shop helped to make the sash and bow.  However, I wanted to make the design on the sash more noticeable, so I decided to hand sew glass beads, following the design of the obi.  This took many, many hours - as each bead needed to be sewn, one by one.  For the end beads, I sewed/threaded the clear string back and forth, both ways, so that they were less likely to move.

Here are a couple pictures of the hand-beading I did on the sash.  

www.lwadamelon.blogspot.com
Photographed by Quinn Photography (but photo was cropped by bride)
www.quinnphotography.net, www.lwadamelon.blogspot.com
Photographed by Quinn Photography


Sunday, October 28, 2012

Classroom Quilt


. . . Whoops!  October was a busy month and flew right by!

This next post is about a quilt I made for my classroom, my first year!  I had a rectangle for each student in my class - where they placed their handprints.  I wrote each student's name under their handprints.  In the middle rectangle, I wrote information about the classroom, including the year, my name, the aides' names, etc.
www.lwadamelon.blogspot.com

After that, I wanted to try and find a way in which to make something where I could try and add students each year I taught . . . because, if I made a quilt every year, I might end up with 20+ quilts?!  So, I decided to make a train! . . . with a car for each student. 

www.lwadamelon.blogspot.com

www.lwadamelon.blogspot.com


The train was getting to be quite long, and there were some discrepancies about fabric being on the wall - so in the end, I decided to find another way in which to remember all of the students I have taught.

After everything, I decided to make a photo album instead.  Each student gets a page - with his/her handprint and a couple pictures.

Now, whenever I am feeling down, or if things aren't going as well due to school politics and such - I look at the album to remind myself why I do what I do . . . it's all for the students!  


Wednesday, September 26, 2012

DIY Duvet Cover

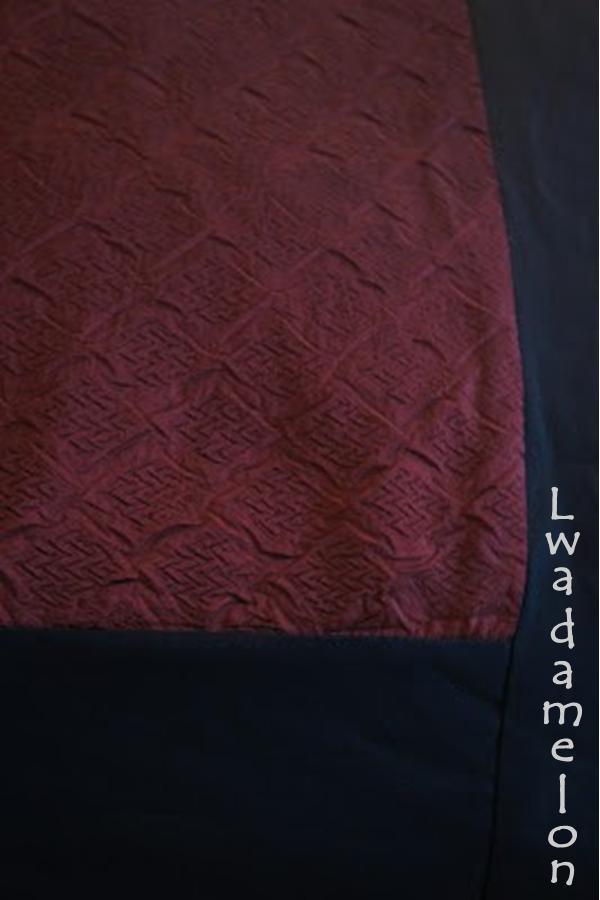
This is where the quilting began.  I had been looking for the perfect duvet cover for years.  But, I could never find anything I liked, for a good price.  I wanted something red and black, with a bit of asian influence.  The pillow on top served as my inspiration - something I bought from a trip to Thailand.  After years of looking for a duvet cover in the stores, I decided to try and make my own.  Then I found this beautiful, red curtain fabric on sale!  What's interesting about it is that it has dimension - the ripples are actually indentations.  I also purchased black fabric for the border and buttons to close it (I left an buttoned opening, so that the duvet cover can be taken off for washing). 

www.lwadamelon.blogspot.com

www.lwadamelon.blogspot.com


Saturday, September 22, 2012

SF Giants T-Shirt Quilt

I can show it now! . . . here is the completed Giants Quilt!  Again, I wish I could have kept it for myself! 

The back is made up of the back of the Giants shirts and extra fabric (as the SF Giants border was quite expensive).

www.lwadamelon.blogspot.com


And this is the front!


www.lwadamelon.blogspot.com

GOOOOO  GIANTS!!!

Saturday, September 8, 2012

Recycled T-Shirt Bags

I went to visit my best friend this weekend and she was knitting recycled bags!  It reminded me of some projects I had finished over the summer . . .

I had been trying to think of other ways to recycle old shirts that I don't want to get rid of (because they have my name on them, they are funny, or because they have a special memory tied to them).  As much as I enjoy making T-shirt quilts - I wanted something different . . . I already have enough blankets as it is.

So, I searched online, and found this http://www.instructables.com/id/FASTEST-RECYCLED-T-SHIRT-TOTE-BAG/?ALLSTEPS


It is super easy!  You basically cut off the sleeves (leaving the seam), then cut the middle/neck (size depending on how big you want the opening to be), and sew the bottom!

www.lwadamelon.blogspot.com


www.lwadamelon.blogspot.com


www.lwadamelon.blogspot.com

www.lwadamelon.blogspot.com


I also started using 2 shirts in order to make thicker, more heavy duty, recycled bags - one for the outside of the bag, and one for the inner lining.  

www.lwadamelon.blogspot.com

www.lwadamelon.blogspot.com


For this particular bag (above), I sewed the straps on (also made from the same T-shirt).  Then I realized it might be easier if the straps were sewn so that one strap is sewn in a U-shape to one side of the bag, and the other strap is sewn in a U-shape to the other side of the bag - Making it easier for loading and carrying (as seen below).
www.lwadamelon.blogspot.com


www.lwadamelon.blogspot.com

www.lwadamelon.blogspot.com

www.lwadamelon.blogspot.com

www.lwadamelon.blogspot.com

www.lwadamelon.blogspot.com


Recycled bags are perfect, too - great for the environment, washable, and many stores are now requiring you to bring your own bag.

(Apologies for the bags looking wrinkled in the photos - I carry/leave them in my car).